|
Update
Query to change data in one or more tables
The how-to sections in this page uses the
Northwind Traders sample database. If you do not have a
copy installed in your PC, you can download it from here
[DOWNLOAD].
Overview
Provides background information about update queries,
including when to use them and when to use other tools,
such as a Delete query, Append and Make-Table queries.
Update data in one
or more fields
Explains the basics of creating and running an update
query against one or more fields in a single table. The
section also explains how to test your update criteria
by first creating a select query, and then converting
that select query to an update query.
Use data from
multiple tables to create an update query
Explains how to build an update query that uses fields
from two or more tables.
Change data in
multiple tables
Explains how to create an update query that changes
data in more than one table. Subsections explain how
improper query design can produce unwanted results.
Update the data
in one table by using data from another table
Explains how to use an update query that takes data from
one table and writes it to records in another table.
Various ways to
use update queries
Individual sections explain how to perform a variety of
tasks: How to "blank out" fields by setting them to
Null, how to add data to Null fields, how to use
parameters in connection with update queries, and how to
use wildcard characters in your select and update
queries.
Overview
Microsoft Office Access 2003 provides
several ways to change the data in a database. For
example, you can open a table or the results of a select
query in Datasheet view — a row and column grid similar
to a Microsoft Office Excel 2003 worksheet — and change
your data manually. But what do you do when you need to
change a large number of records, especially when those
records must meet one or more criteria? You use an
update query.
You can think of update
queries as a more powerful version of the Find and
Replace dialog box. Your update queries contain select
criteria (the equivalent of a search string) and update
criteria (the equivalent of a replacement string). The
query finds all records that match your select criteria,
and then writes your update criteria to those records,
all in one pass.
However, your select and
update criteria can be much more powerful than ordinary
search and replacement strings, because your criteria
can contain expressions (expression: Any combination of
mathematical or logical operators, constants, functions,
and names of fields, controls, and properties that
evaluates to a single value. Expressions can perform
calculations, manipulate characters, or test data.) and
calculations. For example, your select criteria could
find all products that have a discount of 20 percent or
greater, and your update criteria could change those
discounts to a different percentage that you specify.
In addition, your update
queries can use multiple select and update criteria. To
continue the previous example, you could find all
products that have discounts of 20 percent, 18 percent,
or 15 percent, and reduce these discounts to 15 percent,
12 percent, and 10 percent, respectively — something
that you cannot do with other tools.
This topic explains how
to use update queries to perform a variety of tasks,
such as changing Yes values to No values, inserting data
into blank fields, and changing values in more than one
table simultaneously. The how-to steps do not assume
that you're familiar with update queries, and they
provide any expressions that are needed to accomplish
the task being demonstrated. As you proceed, remember
that an update query is not the same thing as what is
called an updatable query. An updatable query is another
type of query (a select query) that displays its results
in a datasheet, and that allows you to change the data
in that datasheet manually. In contrast, update queries
do not display a datasheet when they finish running.
Note Remember that you
use update queries only on existing data. If you want to
insert new records or delete whole records, you must use
different query types or other tools. If you want to
copy records from one table to another, you must create
an Append query. If you want to delete entire records
from a database, you must create a Delete query. If you
want to delete entire records from a database, you must
create a Delete query (but remember that if you want to
remove only part of a record, you must use an
Update
query). If you want to create a table from the records
that are returned by another query, you can create a
Make-Table query.
< Back to
top >
Update data in one or more fields
The steps in these sections
explain how to change values in one or more fields in a
single table. Remember that you can not undo the results
of an update query, so backing up your database
beforehand is a very good idea.
The steps in this section use the
Northwind Traders sample database, but you can adapt the
steps for use with your own data. For information about
opening and using the sample database, see the section
Open the Northwind Traders sample database, also earlier
in this topic.
Note The safest way to use
an update query is to first create a select query that
tests your selection criteria. For example, say that you
want to update a series of Yes/No fields from
No to Yes for
a given customer. To do so, you add criteria to your
select query until it returns all of the desired
No records for that customer. When
you're sure that you have the correct records, you
convert your select query to an update query, enter your
update criteria, and then run the query to update the
selected values. Whenever possible, the how-to sections
in this topic begin with select queries, and then
convert those queries to update queries.
- Create a new query that uses
the Orders table in the Northwind Traders sample
database.
- In the upper pane of the
Query Designer, select the OrderID
field (in Orders table), ProductID
field (in Products table), and
Discount field (in Order Details table), and
drag them to the query design grid.
- In the Criteria
field below Discount, type
>0.2. (Remember to enter the decimal point,
because you're dealing with a percentage value. That
value returns all products that have a discount rate
greater than 20 percent).
- Click Run
 . If you're using the Northwind Traders database,
Access returns 154 records.
. If you're using the Northwind Traders database,
Access returns 154 records.
When you're sure you have the data
that you want to change, convert your select query to an
update query:
- Click Design
 to return the query to Design view.
- On the Query
menu, click Update Query.
Access converts your select
query to an update query, and adds the
Update To field to the Query Designer.
- In the Update
To field under Discount, type
the desired value — in this case, 0.22
Leave the original expression
(>.20) in the
Criteria field. If you remove it, the update
query will change every record in the table,
including those that have no discount applied.
Note To change the
data in more than one field, enter update criteria
for each of the fields that you want to change. You
can specify update criteria for some or all the
fields in the query design grid. Keep in mind that
your update criteria must match the data type
assigned to the fields that you want to update. For
example, you can't replace the value in a Yes/No
field with text.
- To run the query and update
the records, click Run
.
- After you run the update
query and are alerted to confirm the operation,
click Yes.
Access runs the query and
updates the records, but you won't see the datasheet
with the updated data yet.
- To see the results of your
update query, click View
 on the Query Design toolbar.
Note that even though you
included the OrderID and ProductID fields in the
original select query, Access removed them when you
ran the update operation. By default, Access removes
all fields that do not contain update criteria. If
you want to see the additional fields, convert your
query back to a select query and run it again, but
use 0.22 as your select
criteria.
< Back to
top >
Use data from multiple tables to create an update
query
The following steps explain how to create an update
query that searches for a set of products and marks them
as unavailable. The steps assume that you have backed up
your database.
- Create a new query that uses the Products and
Suppliers tables in the Northwind Traders sample
database.
- In the Query Designer, drag the
SupplierID field from the Suppliers table to the
grid, and then drag the SupplierID,
ProductName and
Discontinued fields from the
Products table to the design grid.
For either table, you can hold down CTRL while
you select each field, and then drag the fields to
the design grid simultaneously.
- Click Run
. The query returns 77 records. Scroll down the list
of records, and make a note of the Supplier ID
number assigned to Pavlova Ltd. You'll use that ID
in the following procedure.
Next, you enter criteria to locate a single supplier.
Once you locate the data that you want to change, you
can convert your select query into an update query:
- On the main toolbar, click Design
to return the query to Design view.
- In the Criteria field under
the first instance of SupplierID, type
7 (the ID for Pavlova Ltd.),
and then click Run
to run the query again.
The query returns five records, and you can see
that one product, Alice Mutton, is already
discontinued.
At this point, you can manually select the
Discontinued check box for each
record, but assume instead that you're looking at a
large number of records, and that you need to convert
the existing select query into an update query:
- Click Design
to return the query to Design view again.
- On the Query menu, click
Update Query.
Access converts your select query to an update
query, and adds the Update To
field to the Query Designer.
- In the Update To field under
Discontinued, enter
Yes.
- To run the query and update the records, click
Run
.
When you run the query, an alert message says
that Access will update all five rows, even though
one of those rows already contains a
Yes value.
- In this case, the update operation won't change
the existing value, so click Yes
to run the query.
If you did not want to overwrite the existing
value, you could enter No in the
Criteria field below the
Update To field, as shown in the
following illustration.
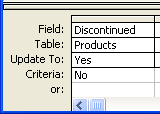
That additional constraint forces the update
query to change only those records that contain a
No value.
Access runs the query and updates the records,
but you won't see the datasheet with the updated
data yet.
- To see the results of your update query, click
View
on the Query Design toolbar.
Notice that even though you included the
ProductID, ProductName, and SupplierID fields in the
original select query, Access removed them when you
ran the update operation. By default, Access removes
all fields unless either they contain update
criteria or the update operation changes them. If
you want to see the data that was originally in your
select query, convert your update query back to a
select query, and then run it again.
< Back to top >
Change data in multiple tables
In a properly designed database (a database in third
normal form), the tables share a set of one-to-many
relationships. For example, in the Northwind Traders
database, all data for suppliers resides in one table,
and all data for products resides in another. Because a
supplier can provide multiple products, a one-to-many
relationship exists between the Suppliers and Products
tables. If you want to change the supplier data for a
given set of products, you only need to change that data
on the "one" side of the relationship — in the Suppliers
table.
For that reason, you don't usually need to update
data in multiple tables by running an update query,
although you can if you need to.
An update query that produces unwanted results
The steps in this section show you how an update
query can produce unwanted results when you change a
record on the "one" side of a one-to-many relationship.
In this example, you need to locate a specific order and
change the name of the employee who took the order:
- Start a new query that uses the Orders and
Employees tables in the Northwind Traders database.
- Drag the EmployeeID,
FirstName, and
LastName fields from the Employees table to the
design grid, and then drag the
EmployeeID and OrderID
fields from the Orders table to the design grid.
- In the Criteria field under
LastName, type Buchanan
- Under FirstName, type
Steven
- Clear the Show check box under
the EmployeeID field for the Orders table.
- Under OrderID, type 10248
Your query should look similar to the one in the
following illustration (though your fields don't
need to be in the order shown here)..
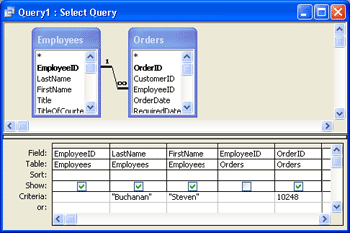
If you click Run
and test the query, it returns one record for order
number 10248.
Once you successfully test your criteria in the
select query, you convert it to an update query and
change your data:
- If you tested the query, click
Design
to return it to Design view and then, on the
Query menu, click
Update Query.
- In the Update To field, under
LastName, type Stahl
- Under FirstName, type Annik
Your query should look like the one in the
following illustration.
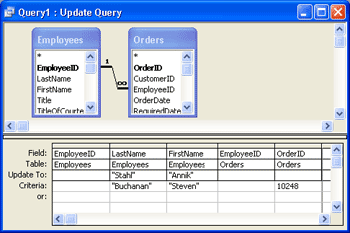
- Click Run
, and then click Yes when asked to
confirm the update operation. The query updates one
row.
On the surface, everything about the update query
seems fine. Your select query returned one record, and
the update query updated that one record. The problem
is, you updated the employee record on the "one" side of
the relationship, and that change affected every order
for that employee on the "many" side of the
relationship. The following steps show how to see the
impact of the change:
- On the Query menu, click
Select Query, and then run the
query again.
The query does not return any results.
- Click Design
to return the query to Design view .
- Replace Buchanan with
Stahl and replace Steven
with Annik and then run the query again.
The query returns one record, for order number
10248.
- Go back to Design view one last time, clear
10248 from the
Criteria field, and then run the query a final
time.
The query returns 42 records for Annik Stahl, and all
of those records used to belong to Steven Buchanan. Even
though you only wanted to change one record, you updated
the wrong field in a one-to-many relationship,
and your change affected all related records. The steps
in the next section explain how to run an update query
that produces a usable result.
An update query that produces correct results
The previous section showed you how changing a record
on the "one" side of a one-to-many relationship
can cause unwanted changes to a large number of records.
The following steps explain how to update records in two
tables on the "one" side of relationships without making
that mistake. In this scenario, one of your suppliers
has been sold to another company. You need to change the
company name and the name of one product. Because it's a
good habit to get into, you start with a select query:
- Start a new query that uses the Products and
Suppliers tables in the Northwind Traders database.
- Drag the ProductID and
ProductName fields from the
Products table to the design grid, and then drag the
SupplierID and
CompanyName fields from the Suppliers table to
the grid.
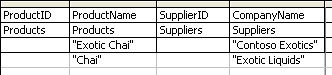
- In the Criteria field under
CompanyName/Suppliers, type Exotic Liquids
Your query should look like the one in the
following illustration.
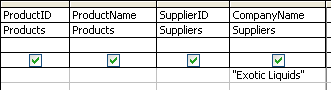
- Click Run
to test the query.
The query returns three records.
Once you've used the select query to confirm that
you're using the right criteria (Exotic Liquids, in this
case), you build your update query. This update query
uses the same approach as the query in the previous
section — it changes records on the "one" side of
one-to-many relationships. In this case, it changes
a supplier name and a product name, but without
affecting a large number of records:
- Click Design
to return the query to Design view and then, on the
Query menu, click
Update Query.
- In the Update To field under
ProductName, type Exotic
Chai
- In the Criteria field under
ProductName, type Chai
- In the Update To field under
CompanyName, type the new
supplier name, Contoso Exotics
- In the Criteria field directly
below CompanyName, type the old
supplier name, Exotic Liquids
Your query should look like the one in the
following illustration.
- Click Run
to run the query, and then, when Access asks you to
confirm a change to one record, click
Yes.
The query changes Exotic Liquids
to Contoso Exotics in the
Suppliers table (on the "one" side of the
relationship), and it changes Chai
(in the Products table) to Exotic
Chai.
To see how changing the values in the two tables
affected the data, go on to the following steps.
- On the Query menu, click
Select to convert the query back
to a select query.
- In the Criteria field under
SupplierID, type 1 and then
run the query.
Exotic Liquids is now
Contoso Exotics, and
Chai is now
Exotic Chai. In this case, changing the
CompanyName field on the "one" side of the
relationship properly cascaded the change through
the related records.
- Go back to the Database window, select the Order
Details table, and then create a new select query
that uses that table.
- Drag the OrderID and ProductID fields to the
query design grid.
- In the Criteria field under
ProductID, type 1 (the product ID for Exotic
Chai), and then run the query.
You can see that every order for
Chai has now changed to reflect the new product
name.
< Back to top >
Update the data in one table by using data from
another table
At times, you may need to update the data in one
table by using data from another table. For example, say
that you get a table of sales data from the Southwest
sales region, and you need to update a table in a global
sales database by using that new data.
Keep the following facts in mind when you update one
table by using data from another table:
- Ensure that the fields in the source table and
in the target table use the same data type. For
example, you can't copy dates to an OLE Object
field. Fields from different tables can have names
that are not identical, but their data types must
match. Also, the update query will not change any of
the field names in the source or destination tables.
- If the source and target tables do not share a
relationship, you need to create a join.
- Create a select query that tests your initial
selection criteria, and then convert the select
query into an update query. In the
Update To fields in the update query, you use
the following syntax: [tablename].[fieldname],
where [tablename] is the
name of the source table, and [fieldname]
is the name of the field that you want to copy to
the destination table.
The steps in the following sections explain how to
duplicate a table, change some records in the duplicated
table, join that table to its original in a query, and
then run an update query that copies records. Start by
copying one of the tables in the Northwind Traders
database and changing some of the records. The changed
records become sample data for use in your update query:
- In the Database window, under
Objects, click Tables.
- Right-click the Suppliers table and then click
Save As. The Save As
dialog box appears.
- Name the copied table
Suppliers2 and ensure that the As
list contains Table, then click
OK to create a copy of the
Suppliers table. The copied table appears in the
Database window.
- Open the Suppliers2 table in Datasheet view.
- In the first record (which has a Supplier ID of
1) change the values in the
Address, City, Region, and Postal Code fields. (You
can change these values to any values that you
want).
- Do the same for the third, sixth, and ninth
records, and then close the table.
You'll use the Suppliers2 table as the source table
for the update query. But first, test the criteria in a
select query:
- Create a new query that uses the Suppliers and
Suppliers2 tables in the Northwind Traders database.
The Suppliers and Suppliers2 tables do not share
either a relationship or a join, so you need to
create a join and build a select query.
- On the main toolbar, click Tools
and then click Relationships.
- In the Suppliers2 table, click the
SupplierID column, drag it to
the Suppliers table, and drop it on the
SupplierID column in that
second table. (Access creates a join, and indicates
the join with a line).
- In the Suppliers table, drag the
SupplierID,
Address, City,
Region, and
PostalCode fields to the design grid.
- In the Criteria field under
SupplierID, type
1 or 3 or 6 or 9
These are the IDs of the fields that you changed
in the Suppliers2 table.
- On the main toolbar, click View
to preview the query.
The records in the query should match the records
that you changed in the previous section. If not,
click Design
to return to Design view, and then adjust your
criteria until they return the correct records.
Once your select query returns the correct records,
you convert it to an update query and add the table and
field names, using the syntax provided at the beginning
of this section:
- On the Query menu, click
Update Query to convert your
select query to an update query.
- In the Update To fields under
Address, City, Region, and PostalCode, enter the
corresponding table and field names from the
Suppliers2 table. Your finished query should look
something like this:
| |
|
|
|
|
|
| Field: |
SupplierID |
Address |
City |
Region |
PostalCode |
| Table: |
Suppliers |
Suppliers |
Suppliers |
Suppliers |
Suppliers |
| Update To: |
|
[Suppliers2].[Address] |
[Suppliers2].[City] |
[Suppliers2].[Region] |
[Suppliers2].[PostalCode] |
| Criteria: |
1 Or 3 Or 6 Or 9 |
|
|
|
|
- Click Run
to run the query.
- When Access asks you to confirm the update for
four records, click Yes.
- Convert your update query back to a select query
(leaving the values in the Criteria
field unchanged) to see the changed records in the
Suppliers table.
< Back to top >
Various ways to use update queries
The following sections demonstrate some additional
ways to use update queries. The sections explain how to
"blank out" a field by setting its values to
Null, and how to do just the
opposite — how to add values to Null
or empty fields. Additional sections explain how to add
or delete a few characters in a field, how to use
parameters in connection with update queries, and how to
use wildcard characters in your select and update
queries.
"Blank out" a field (set the values in a field to
Null or enter zero-length strings)
You can use an update query to "blank out" a field by
setting its values to Null or by
changing its values to zero-length strings. The
following procedure shows how to perform both tasks.
You can set fields to Null, or
enter zero-length strings, for a variety of reasons. In
this exercise, one of your suppliers is changing its
prices. You don't want to ship any of that supplier's
products until you get the new prices, so you set the
price values for that supplier's products to
Null. Using null values or
zero-length strings stops your database from performing
calculations, which in turn stops you from completing
and shipping orders. You could set the price values to
zero instead, but your database can still use a zero
value in calculations, so by using Null
you ensure that you don't ship orders by mistake.
- Create a new query that uses the Products and
Suppliers tables in the Northwind Traders database.
- Drag the SupplierID field
from the Suppliers table to the design grid, and
then drag the SupplierID,
ProductID,
ProductName, and UnitPrice
fields from the Products table to the grid.
Adding the SupplierID fields from both tables
gives you all of the information that you need to
create your update query. As a rule, it helps to
give yourself as much data as possible, because
doing so can ensure greater accuracy in the results
that your update query produces.
- Click View
to preview the query, or click Run
to run the query. The query returns 77 records.
- Note the supplier ID number for Tokyo Traders (4).
Now that you have the information needed to set the
correct records to Null, convert
your select query to an update query and then make your
changes:
- On the Query menu, click
Update to convert the query to an
update query.
- In the Criteria field, under
SupplierID/Products, type 4
- In the Update To field under
UnitPrice, type Null or,
to enter zero-length strings, type a pair of double
quotes with no space between them ("").
- Click Run
to run the query.
- When Access asks you to confirm the update of
three records, click Yes.
- Convert your update query back to a select
query.
- In the Criteria field under
UnitPrice, type Is Null and then run the
query.
If you entered a zero-length string, type a pair
of double quotes with no space between them ("")
in the Criteria field, and then
run the query.
The query returns all three records for Tokyo
Traders, and the UnitPrice field contains no values.
- Note the product ID numbers for all three
products (9, 10, and 74).
Leave the query open, and go on to the next section
for information about adding data to fields that contain
Null values or zero-length strings.
Add data to "empty" or "blank" fields
The steps in this section explain how to find fields
that contain Null values or
zero-length strings, and how to add data to those
fields. These steps reverse the action that you took in
the previous section, and the steps assume that you have
left the query from that section open.
You can add data to a field that contains
Null values or zero-length strings
manually, or by running an update query. The following
sections explain how take both actions.
Add data to a Null field manually
- With the query or table open in Datasheet view
(the view that you had open at the end of the
previous section), enter the desired value in the
fields that contain Null values
or zero-length strings.
For example, if you have the query open from the
previous section, you can type 97 in the
UnitPrice fields for Mishi Kobe Niku, 31 for
Ikura, and 10 for Longlife Tofu.
Note You can't update some of the fields
when working in Datasheet view.
Use an update query to add data to Null fields
Depending on your situation, you may find that
entering data manually is faster than running an update
query.
- Return the query from the previous section to
Design view.
- In the Criteria field under
ProductID, type 9 (the Product ID for Mishi
Kobe Niku).
- In the Update To field under
UnitPrice, type 97
- Click Run
.
- When Access asks you to confirm the update of
one record, click Yes.
- Repeat steps 2 through 5, but this time type
10 in the Criteria field and
31 in the Update To field.
- Repeat steps 2 through 5 again, but this time
type 74 in the Criteria
field and 10 in the Update To
field.
Those steps restore the original price values that
the update query in the previous section set to
Null.
Use parameters with your update queries
You can use a mix of input parameters and update
queries whenever doing so makes sense. For example, you
can create an input parameter that prompts users for a
value, such as a product name. When the user enters the
product name and runs the query, the query, in turn, can
change a value associated with the product name, such as
a price or a discount.
The steps in this section explain how to create a
query that does just that. The query asks you to input a
product name, and it then doubles the price for that
product:
- Create a new query that uses the Products table
in the Northwind Traders database.
- Move the ProductName and
UnitPrice fields to the grid,
and then either click View
to preview the query, or click Run
to run the query. The query returns 77 records. Note
the unit price for Chai,
$18.00.
Note If
you've followed the other exercises in this topic,
you may have changed Chai to
Exotic Chai. If you have, keep
that change in mind, along with the unit price.
Next, you convert your query to an update query, and
enter a query parameter and expression that changes a
unit price.
- On the Query menu, click
Update to convert the query to an
update query.
- In the Criteria field under
ProductName, type the following parameter exactly as
shown: [Enter Product Name:]
- In the Update To field under
UnitPrice, type the following expression exactly as
shown: [UnitPrice]*2
Your finished query should look something like
this:
| |
|
|
| Field: |
ProductName |
UnitPrice |
| Table: |
Products |
Products |
| Update To: |
|
[UnitPrice]*2 |
| Criteria: |
[Enter Product Name:] |
|
- Click Run
to run the query.
The Enter Parameter Value
dialog box appears, prompting you to enter a product
name.
- Type Chai — or, if you changed the
product name in a previous exercise, type Exotic
Chai and then click OK.
- When Access asks you to confirm the update of
one row, click Yes.
If you convert your query back to a select query and
run it again, or if you open the Products table in
Datasheet view, you can see that the query changed the
price of Chai from
$18 to $36.
Use wildcard characters in update queries.
You can use wildcard characters in update queries,
but remember that they work best when used in the
Criteria field of the Query Designer.
If you use wildcard characters in the
Update To field of the Query Designer, Access treats
them as literals and writes them to your database — a
result that you do not want.
Note For more information about using
wildcard characters, you can see in the Access Help
topics: Find and replace part or
all of a record in an Access table, query, or form
and Access wildcard character
reference.
Finding dates can be one of the harder problems to
solve when using wildcard characters. Access stores
dates as numbers, but you can apply formatting to those
numbers and make the dates fit almost any cultural or
geographic preference. For example, a Date/Time field
may store a date as 7/14/1996, but
a format can render that same date as
14-Jul-1996. In order to find dates by using
wildcard characters, you sometimes need to remove any
formatting.
The following exercises show you how to query for
dates by using wildcard characters, and also how to
build an update query from the results of the first
query:
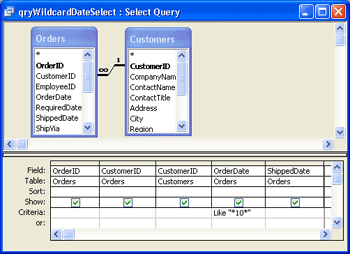
- Create a new query that uses the Orders and
Customers tables in the Northwind Traders database.
- From the Orders table, drag the
OrderID, CustomerID,
OrderDate, and
RequiredDate fields to the design grid.
- From the Customers table, drag the
CustomerID field to the design
grid, and drop it between the existing
CustomerID and
OrderDate fields.
- In the Criteria row, under
OrderDate, type Like "*10*"
Your query should look like the one in the
following illustration.
- Click Run
to run the query.
The query returns records that contain
10, such as
10-Jul-1996, but it also returns records that don't
seem to contain 10, such as
03-Oct-1997. Why? Because in the
Gregorian calendar, October is the tenth month, and
Access disregards the formatting when you use wildcard
characters in a query.
Leaving the query open, go on to the next steps to
see how removing the format can help you remove the
confusion that query results can sometimes cause:
- Open the Orders table in Design view.
- Select the OrderDate field.
- On the General tab (at the
bottom of the table design grid), clear the format
from the Format field by
highlighting dd-mmm-yyyy and
then pressing the DELETE key.
- Save your changes, and then close the table
design grid.
- Rerun the query that you created in the previous
steps.
With the format removed, Access displays the values
in the Order Date column in the mm/dd/yyyy format, while
the date values in the Shipped Date column appear in the
dd-mmm-yyyy format. Note that each of the Order Date
values returned by the query contains
10. So if a query seems to return unwanted results,
try removing any formatting and running the query again.
Also, you can use this approach to filter data. For
example, the criterion Like "10*"
returns records only for October, and Like
"*10/1996" returns only orders placed on the tenth
day of any month in 1996.
Once your original select query returns the correct
set of records, you can then create an update query. For
this example, suppose that one of your employees
imported data for several orders, but set the ship dates
incorrectly. The query that you created in the previous
steps already provides customer ID numbers, order dates,
and ship dates, so the following steps show you how to
work with dates in an update query:
- Reopen the query in Design view.
- In the Criteria field under OrderDate, type
Like "10/*/1997" and then run the query again.
The query returns all orders for October of
1997 — 38 records.
Your employee entered incorrect ship dates for
three customers — Alfreds Futterkiste, White Clover
Markets, and Save-a-Lot Markets.
- Note the customer IDs for each customer, reopen
the query in Design view, and enter each ID in the
Criteria field under either of the
CustomerID fields — either the one from the Orders
table or the one from the Customers table — exactly
like this: "alfki" or "whitc" or "savea"
Make sure you that you include the quotation
marks as shown. You don't need to worry about using
uppercase and lowercase letters in your criteria,
but Access will capitalize each instance of "or".
Note You can put each ID on a separate
"Or" line in the Query Designer, but if you do so,
you also have to copy the date criteria and paste it
to each line. The resulting query would look
something like this:
| |
|
|
|
|
| Field: |
OrderID |
CustomerID |
CustomerID |
OrderDate |
| Table: |
Orders |
Orders |
Customers |
Orders |
| Sort: |
|
|
|
|
| Show: |
|
|
|
|
| Criteria: |
|
|
ALFKI |
Like "10/*/1997" |
| Or: |
|
|
WHITC |
Like "10/*/1997" |
| |
|
|
SAVEA |
Like "10/*/1997" |
- Run the query again.
The query returns 10 records. Now you need to
change the ship dates.
- Reopen the query in Design view and then, on the
Query menu, click
Update.
- In the Update To field under
ShippedDate, type the following expression exactly
as shown: [ShippedDate]-1
- Run the query.
< Back to top >
|